InstallerApp2ISO is an opensource utility for converting a macOS Installer application to a bootable ISO image.
It can also generate a VirtualBox vdi disk image for booting a macOS VM using an APFS file system.

| Documentation and Source |
| Download InstallerApp2ISO |
| Overview |
| Creating a VirtualBox VM Running macOS Mojave (or later) |
| Starting a VirtualBox VM at Login |
 Creating a VirtualBox VM Running macOS Mojave (or later)
There is no need to create a VDI file containing the APFS driver if you have installed VirtualBox 6.1.0 or later.
There are a number of steps to create a working Mojave (or later) VM in VirtualBox. This guide assumes you have some familiarity with creating and maintaining VirtualBox VMs.
A comprehensive usage guide is include in the VirtualBox distribution and you should refer to this for things you don't understand about creating or running a VM.
Prerequisites
- Download VirtualBox and install it (see https://www.virtualbox.org)
- Also download and install the Oracle VM VirtualBox Extension Pack (from the VirtualBox download site)
- Download the current Install macOS Mojave (or later) from the the Apple App Store. You can skip this step if you already have the installer.
- Download InstallerApp2ISO from this site.
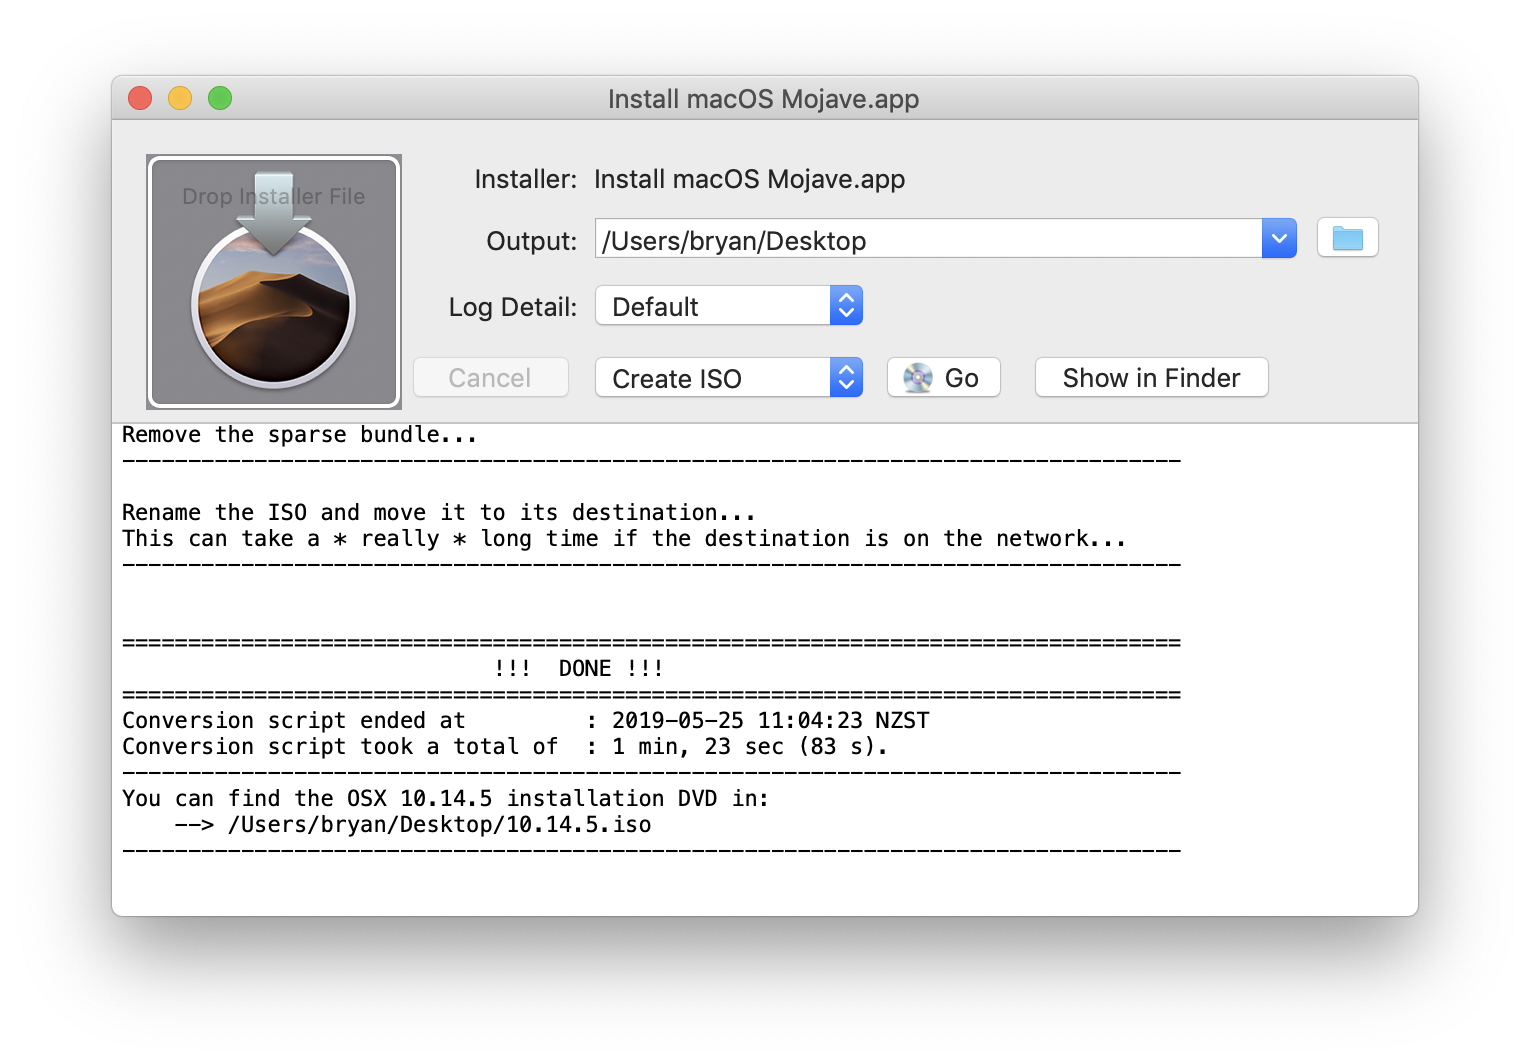
Create Mojave (or later) installation files
- Run InstallerApp2ISO and create an installer ISO from the Install macOS Mojave (or later) application.
-
There is no need to create a VDI file containing the APFS driver if you have installed VirtualBox 6.1.0 or later.Run InstallerApp2ISO and create a VDI file from the Install macOS Mojave (or later) application. You will be prompted for a name and a size.
It is a good idea to choose a name for the disk that reflects the name you will use for the VM. Avoid using spaces in the name if possible.
Also, have a think about how big you want this VDI to be. Choose a reasonable size for your intended use of the VM.
Set up a new VM for macOS Mojave (or later)
If you are using VirtualBox 6.0.x or earlier, you should follow these steps.
For later versions of VirtualBox, please refer to the VirtualBox manual.
- Run VirtualBox and make a new VM. Use the macOS 10.13 (High Sierra) template and choose a name for your VM that is similar
(if not the same as) to the name you chose for your VDI. Avoid using spaces in the name if possible.
- Do NOT add a virtual hard drive to this machine - you'll add it later.
- Most of the settings are best left at their default values.
- You MUST configure a USB 3.0 (xhci) controller.
- Configure the number of CPUs you wish to allocate to the VM. 2 CPUs is a good number for the installer and can always be increased later.
- Configure the RAM you wish to allocate to the VM. I suggest a minimum of 3GB but this is dependent on how much real memory is installed in your machine.
- Configure the Video Memory to 128MB.
- Do NOT overcommit your host resources - performance of both the host and the guest will suffer if you do.
- Close the Settings window.
- Right-click your VM in the list of VMs. Select Show in Finder and the folder containing the configuration files for your new VM will open.
- Copy your newly minted VDI file into the VM folder. By default the VDI was created on your Desktop.
- Back in VirtualBox, open the new VM settings and add your new VDI file as the hard drive for your new VM. Be sure to choose the VDI file you copied into your VM folder in the previous step.
- Add a DVD drive to your VM (if you don't already have one) and assign your ISO to the drive.
Run your new VM
- Start your new VM and it should boot from the ISO installer, eventually leading you to the familiar macOS Installer.
- Jump through all the installer hoops and an initial macOS installation will be performed from the ISO to your VDI.
- After this first phase of installation your VM will reboot. Interrupt it (power off the VM or close its window).
- Back in VirtualBox, open the VM settings and remove the ISO from the DVD drive. If you don't do this, the VM will once again boot from the ISO.
- Reboot the VM with the ISO removed and the macOS installer should proceed to completion.
Post Installation Tweaks
Once you have succesfully installed macOS Mojave (or later) into a VM, you may wish to consider the following:
Consult the VirtualBox usage guide if you are unsure how to make these tweaks. You will also find useful information
in the VirtualBox online forums.
- Change the size of the macOS desktop.
- Change the networking setup. The default is NAT.
- Assign a serial number to your VM.
- Install the VirtualBox Guest Additions. Currently this will fail. VirtualBox is not notarized and until it is, macOS 10.14.5 (and later) will refuse to install the kernel extension (kext) files.
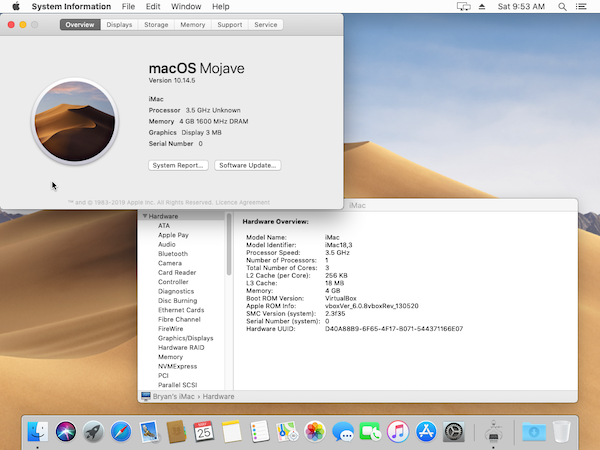
A successful Mojave install in a VirtualBox VM
Starting a VirtualBox VM at Login
Several VirtualBox users have asked how they can launch their VM(s) automatically when they login. In answer to this, I have written a shell script that achieves this aim by installing a user LaunchAgent.
LaunchAgents are configured with an Apple plist XML file installed in the users Library/LaunchAgents folder. When the
user logs in to their account on the Mac, launchd will inspect these plist files and invoke the required program with specified
arguments.
It can get a bit tricky to create a plist manually. They have very fussy and very unforgiving syntax requirements. This shell script will create the plist and install it in the LaunchAgents directory.
You can download the script from vboxlaunchagent.sh. Unzip the file and copy the script to a suitable directory on your machine. In the example below I have copied the script to my Desktop.
The example below installs a LaunchAgent for my VM named "debian small" and configures it to start in headless mode.
number9:Desktop bryan$ sh vboxlaunchagent.sh --headless --verbose "debian small"
================================================================================
vboxlaunchagent.sh - Launch Agent creation tool for starting a VM at login
================================================================================
Version: 1.0.0
Copyright (C) 2019, granada29 @ VirtualBox forums.
with help from socratis @ VirtualBox forums.
All rights reserved.


VERBOSE OUTPUT
--------------------------------------------------------------------------------
DEBUG        =
HEADLESS     = true
REMOVE       =
VERBOSE      = true
VMNAME       = debian small
AGENT        = org.virtualbox.launch.debian small
LAUNCHAGENT  = /Users/bryan/Library/LaunchAgents/org.virtualbox.launch.debian small.plist
TEMPAGENT    = /tmp/org.virtualbox.launch.debian small

VirtualBox VM found. . . : debian small
Created temporary file . : /tmp/org.virtualbox.launch.debian small
Created Launch Agent . . : /Users/bryan/Library/LaunchAgents/org.virtualbox.launch.debian small.plist
number9:Desktop bryan$
Usage: vboxlaunchagent [options] "vm name"
Options
- -h|--headless
-
By default the script creates a Launch Agent for a VM that's running normally.
Given this option, that VM will start in the background, headless.
- -d|--debug
-
This will create an additional two files in the "/tmp" folder, "/tmp/$VMNAME.log"
and "/tmp/$VMNAME.error.log" in case something goes wrong and you want to look at the error output.
- -r|--remove
-
Remove an already existing Launch Agent entry for "VM_name".
- -v|--verbose
-
Print analytical messages about what the script is doing.
NB: The vm name should be enclosed in quotes - especially if it contains spaces or special characters.
Download InstallerApp2ISO
InstallerApp2ISO is code-signed with my Apple Developer certificate and has also passed Apple's notarization process.
Download InstallerApp2ISO 1.0.8
InstallerApp2ISO 1.0.8 - Changes and FeaturesEnhancements
- Added support for macOS 10.15.8
Download InstallerApp2ISO 1.0.7
InstallerApp2ISO 1.0.7 - Changes and FeaturesEnhancements
- Added support for macOS 10.15.5, 10.15.6.
Download InstallerApp2ISO 1.0.6
InstallerApp2ISO 1.0.6 - Changes and FeaturesEnhancements
- Added support for macOS 10.15.3, 10.15.4.
Download InstallerApp2ISO 1.0.5
InstallerApp2ISO 1.0.5 - Changes and FeaturesEnhancements
- Warn users with VirtualBox 6.1 or later that an apfs driver in the EFI partition is no longer required.
- Added French localisation - thank you Jean-Pierre Kuypers.
- InstallerApp2ISO.sh updated from upsteam - thank you @socratis.
Fixed
- Possible crash when running on MaxOSX 10.9 (Mavericks).
Download InstallerApp2ISO 1.0.4
InstallerApp2ISO 1.0.4 - Changes and FeaturesEnhancements
- Disable spotlight indexing of mounted disk images.
- Added support for macOS 10.15.1, 10.15.2.
Download InstallerApp2ISO 1.0.3
InstallerApp2ISO 1.0.3 - Changes and FeaturesEnhancements
- apfsvdi.sh uses VirtualBox utilities directly, rather than via wrapper scripts.
- Updated InstallerApp2ISO.sh from upstream. Thanks @socratis.
Download InstallerApp2ISO 1.0.2
InstallerApp2ISO 1.0.2 - Changes and FeaturesEnhancements
- Support for creating a macOS 10.14.6 (Mojave) installer iso
Download InstallerApp2ISO 1.0.1
InstallerApp2ISO 1.0.1 - Changes and FeaturesEnhancements
- Support for creating a macOS 10.15 (Catalina) installer iso
- Support for creating a macOS 10.14.5 (Mojave) installer iso
- Added "Dry Run" switch to see what will happen without changing your system.
- Version checking for new releases of InstallerApp2ISO
Download InstallerApp2ISO 1.0.0
InstallerApp2ISO 1.0.0 - Changes and Features- First public release